Installing Debian on Existing Encrypted LVM
I run Debian on a number of machines. When I switched my personal computer to it, I already had an encrypted LVM with a separate /home volume that had most of my life on it. Coming from Fedora, this was no big deal; the Anaconda installer is very friendly about this. Partman… less so. Debian’s default disk configuration tool provides you with what you need to create encrypted volumes, but not to reuse them. This guide is for Debian 10 Buster, but I can tell you I’ve been doing it this way since 8 Jessie, and I recently did it on 11 Bullseye Alpha.
My test environment is a fresh install of Debian 10 where the encrypted volume and LVM were configured by the Debian installer. We are going to manually open the encrypted volume, activate the LVM, install without formatting the home volume, and modify /etc/crypttab before finishing so that we’ll be able to boot.
Boot up the Debian installer, select Advanced options… and then Expert install.

I’m assuming you can get through most of this wizard on your own. This guide is specifically to get you through partitioning and bootup. Continue through until you get to Load installer components from CD. From here, you want to select crypto-dm-modules and rescue-mode.

Continue working through the installer, but stop before clicking on Detect disks. Instead, click ctrl+alt+f2 to jump into a shell.
We can load the necessary modules from here.
# depmod -a
Next, use cryptsetup to unlock your lvm on luks device. It takes the device and a friendly name. In my example, these are /dev/sda3 and debian-crypt.
# cryptsetup luksOpen /dev/sda3 debian-crypt
Enter passphrase for /dev/sda3:
If this goes well, /dev/mapper/debian-crypt should now be available. Let’s open the volume group.
# vgchange -ay
We should see our logical volumes and our crypt device. In my case:
# ls /dev/mapper
control debian-crypt debian-home debian-root debian-swap
Hit ctrl+alt+f1 to return to the Debian installer and continue to Partition disks. Select Manual. We should now see all of our volumes that we couldn’t access in the installer before.

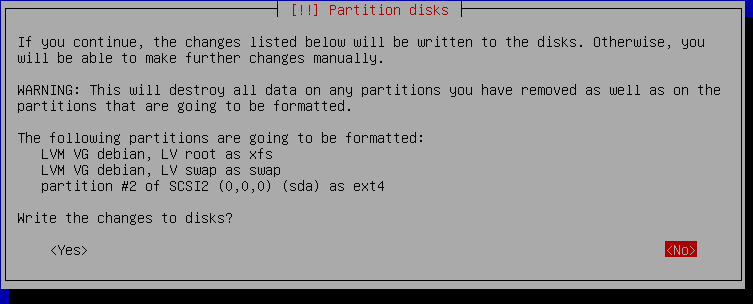
In my case, I am going to set partition #2 to format as /boot. I will format my partition for root but tell it to keep my data for home. Adjust per your needs. It should look something like this at the end.

Stop to verify you didn’t accidentally format a volume you didn’t want to. As well, you should still back up before doing something like this.

If all looks good, select Yes and continue through the base installer, stopping before Install the GRUB bootloader to a hard disk. Again, hit ctrl+alt+f2 to jump into a terminal.
Get the UUID of the device you’re trying to map.
# blkid
You should see the device you ran cryptsetup with listed here. Copy down the UUID for it. You can just use the device name in the next step, but if your computer has more than one disk drive, this could sometimes get confused. I’m also using debian-crypt as the friendly name like I did during the cryptsetup step.
# nano /target/etc/crypttab

# <target name> <source device> <key file>	<options>
debian-crypt UUID=98071a5c-fa7f-40b6-aeb2-64c6d9debeaa none luks
Continue to the end of the installation. When the generating initramfs step appears, the image will be built using the crypttab file you just modified. That’s it. Reboot and Debian will be using your existing LVM.
